
In the realm of self-care for muscles, the foam roller reigns supreme. It may seem unassuming, but its benefits are anything but. It doesn’t matter if you’re a seasoned athlete or a weekend warrior. When you foam roll as part of your routine, it can make the difference between stiff, achy muscles and feeling like a million dollars. While most of us are familiar with rolling out the quads and hamstrings, there are three key areas that often fly under the radar. Let’s shine a spotlight on these unsung heroes of foam rolling: the shin, the shoulder, and the groin.
The Shin: Tackle Shin Splints From Both Sides!!
How often do you give your shins the attention they deserve? If you’re like most, probably not enough. Yet, these oft-neglected lower leg muscles play a crucial role in stabilizing your ankles and supporting your stride. Whether you’re a runner pounding the pavement or simply on your feet all day, tight shins can lead to discomfort and even injury.

When you foam roll the shin, it not only relieves tightness and discomfort but also improves flexibility and range of motion of the ankle. Begin in a table top position with the foam roller towards the outside of your shin. This is important because you want to avoid rolling on any bone! Using your hands and even toes for support, gently roll back and forth from just below the knee to about ¾ of the way down your shin where the bulk of muscles end. Spend 1-2 minutes searching before stopping on any tender spots. Do this on each leg, and feel the tension melt away!
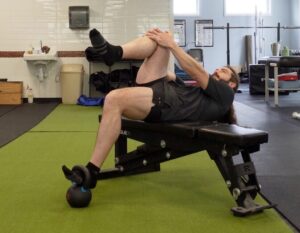
The Shoulder: Unlocking Freedom of Movement
In today’s sedentary society, everyone is dealing with some kind of shoulder tension. Whether it’s from hunching over a computer or carrying heavy bags, our shoulders bear the brunt of modern life’s demands. Yet, they often don’t get the TLC they need to stay happy and healthy.

Foam rolling the shoulders can work wonders for releasing built-up tension and restoring proper alignment. Lie on your side with the foam roller just below your armpit but above your ribs. We are going to target your lats, deltoid and even more importantly, the rotator cuff. Gently foam roll up and down, exploring different angles and adjusting the pressure as needed. To add an active release element to this, find a tense spot (there will be plenty). Keeping your elbow in a 90 degree angle, try and move your fist/shoulder like a lever. You’ll want to go as far as you can behind you and then towards the ground. Spend 1-2 minutes on each side, and feel the knots loosen and the stress dissipate.
This is great for unlocking overhead mobility! You’ll see a big difference in your yoga practice as well as overhead presses!
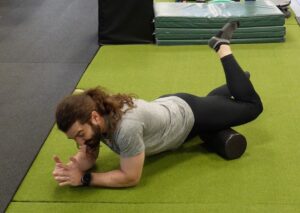
The Groin: Embracing the Inner Thigh
A notoriously overlooked area in general, but especially in the world of foam rolling. Yet, its importance cannot be overstated, especially for athletes and fitness enthusiasts. The muscles of the inner thigh play a crucial role in stabilizing the hips and pelvis, supporting movements in all directions. By working through this area you’ll improve your ability to flex and extend. Squatters and runners see huge benefits when they foam roll through this area.

To foam roll the groin may feel awkward at first, but the benefits are well worth it. Lie facedown with the foam roller under one inner thigh, supporting your upper body with your arms. The adductors, better known as the groin, make up most of the muscle mass in your leg. They span from the knee to the hip and into the back of your leg! Since this muscle is so big, we recommend segmenting it out into areas. Think of it in quadrants to make sure you’re getting it all! Foam roll all the way from the hip to the knee. Take your time and breathe deeply into any areas of tightness. Active release techniques for this are to find a spot, and then bend and straighten your knee while holding on the area. Repeat on the other side!
Fun Fact! People often complain of hamstring tightness and issues but it’s really their adductor/groin!
Watch our How To Video on Foam Rolling These 3 Areas!
The foam roller is a powerful tool for maintaining muscle health and enhancing performance. Neglecting these areas can lead to imbalances, reduced mobility, and even injury. By using your foam roller through areas like the shin, shoulder, and groin, you can unlock new levels of flexibility, mobility, and overall well-being. So, next time you roll out your mat, don’t forget to show these unsung heroes some love. Your body will thank you for it.
Feeling Bored... And Stiff?


Tired of the same old exercises? If your routine is feeling stale or even worse… you’re feeling stiff it’s time to switch it up! Sign up for MDFit Mobility. We offer daily 15 minute mobility programming that covers your entire body! Best yet, we switch it up every 4 weeks so you never get bored of the same routine. You’ll systematically improve your mobility in all the areas that count. Try it before you buy with a free week trial! There’s nothing stopping you from improving your mobility today!