When you move your shoulder does it feel crunchy, sticky, or smooth? We’re not talking peanut butter here… If you’re struggling with that sticky or crunchy feeling it sounds like your shoulder mobility needs some work. Don’t worry, we’ve got your back—literally! Whether you’re an athlete, desk jockey, or weekend warrior, improving shoulder mobility can make a huge difference in how you move and feel. Today, we’re introducing a signature Mobility-Doc Primer, and showing you how to improve shoulder mobility in just 10 minutes!
Let’s dive in!
Why Asymmetry Matters
Each of these exercises are asymmetrical, meaning you’ll do them one arm at a time. Why? It helps highlight imbalances between your sides. We all have differences in strength, mobility, or flexibility between left and right. Working each arm separately lets you really feel the difference, so you can focus on evening things out.
To unlock your shoulders, we need to target three key components: flexibility, stability, and strength. The Mobility-Doc Primer combines three exercises that hit all three aspects. It’s simple, fast, and oh-so-effective.
Ready? Let’s break down the exercises!
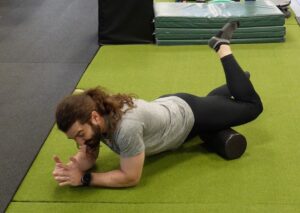
1. Thoracic Rotations: 3 Positions
1 - regular rotations
2 - bent arm rotations
3 - twisted angels
The first exercise in our primer, thoracic rotations, are key for unlocking your upper back and shoulders. Here’s the twist (pun intended!):
Regular Rotations: Start by laying on one side, bottom leg straight, top leg up at hip height. Move your arm across your body leading with your fingertips. Keep your hips still and really try to reach through your shoulder allowing you to get more stretch! Repeat 3X
Bent Arm Rotations: Stay in the same position. Do the same motion with a 90 degree angle in your top arm. Repeat 3X
Twisted Angel: Stay in the twisted position trying to get both shoulders to the ground. With the same arm you’ve been using, keep your elbow and back of your hand as close to the ground as possible. Now bend and straighten your elbow. Repeat 3X
Why 3 positions? This stretches your thoracic spine and shoulder joint in different ways targeting different aspects of shoulder flexibility
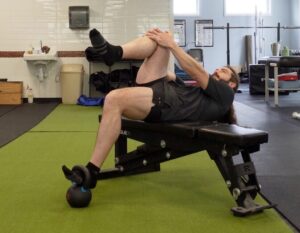
2. Arm Sweeps
Don’t move from the previous position! This powerful exercise begins on the ground with that same twisted position we started with.
Move your arm in a large sweeping motion being aware to flip your palm towards the ceiling when your arm is overhead and back down when your arm reaches hip level. Sweep 10X per side
3. Single Arm YTW’s
This is where we add stability and strength to the mix. Stand with your arms by your side. Hinge your hips backwards so your upper body is forward. Using one arm, make a Y shape (thumb facing up) then reset. Next move through the T and W positions (palm to the ceiling) resetting in between. Do 5 reps per side.
Y position
T position
W position
It may sound simple, but this targets the muscles that support shoulder movement and help hold everything in place. It is challenging and tiring so listen to your body. Form comes first!! This exercise glues your newfound flexibility together with better movement patterns.
Putting It Together
Here’s the secret sauce: circuit style. Move through all three exercises for three rounds. This keeps your body engaged and allows each exercise to build on the one before it. You’ll see faster improvements in range of motion and overall shoulder health.
Doing this primer properly should only take about 10 minutes! And trust us, consistency is key. Incorporating this daily will speed up your progress and keep your shoulders feeling strong and mobile. Add this 10 minute primer into your routine as a warm up, pre-warm up, or cool down.
Watch This How To Improve Shoulder Mobility Video
We hope you enjoyed learning about how to improve your shoulder mobility! Just three simple exercises—thoracic rotations, arm sweeps, and single-arm YTW’s—done daily in a circuit is easy, effective, and gives your shoulders the love they need to move better and feel great. Reach out on our socials if you have any questions! We’d love to hear how the exercises are going and want to see your progress!
Unlock Your Shoulders in Just 4 Weeks with MDRx Shoulder Mobility Program
Feeling stiff? Aching? Cracking? It’s frustrating when your shoulders hold you back from moving freely. You want to feel strong, flexible, and pain-free, but all the stretches and random exercises you’ve tried just don’t stick.
We get it. That’s why we created the MDRx Shoulder Mobility Program—designed to target the root cause of shoulder stiffness: lack of flexibility, stability, and strength.
For just $15, you’ll get 4 weeks of daily, easy-to-follow 10-15 minute primers that actually work. These are based on our Mobility-Doc Method, a proven system thats worked on thousands of patients to help you feel better and move with ease.
In just 4 weeks, you’ll notice a difference. No more cracking, crunching, or feeling limited in your daily activities.
Take action now. In 4 weeks, you’ll have stronger, more flexible shoulders that last.
Receive updates when our blog, featuring the latest health and wellness information, is released along with other special events – No, we won’t send you things every day, but once or twice a week!