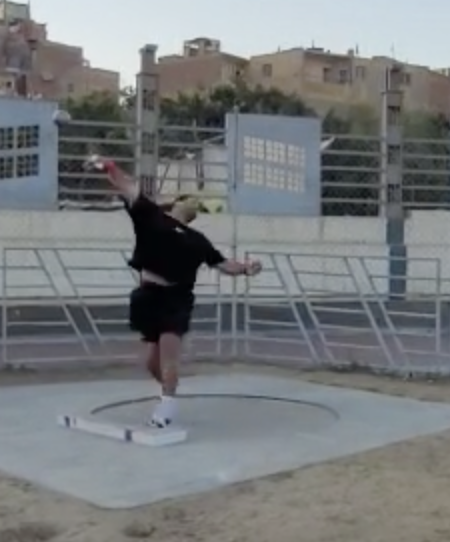

If you’re a thrower the ideas of a wide sweep leg, blocking, and driving through your weight transfer should all sound very familiar. When working on your block, there’s so much more to think about than a planted flat foot and the snap of your hips. The position you need to hit to deliver the most energy through your throw is high on the toe with your knee over that stretched foot. Access it during your throws by layering new flexibility, stability, and strength into your dominant side’s foot and calf.
The Exercises
For these 4 exercises you’re going to need a ball (hypersphere go, lacrosse, or field hockey ball), a block, and a band. Let’s take your throws that much further!
Mobilizing The Connective Tissue

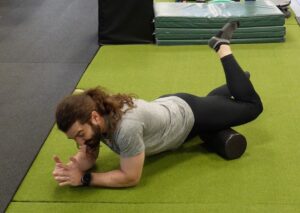
If you’re not going for regular foot massages you’re definitely going to love this! Your foot is filled with tiny bones, ligaments, tendons and muscles. These can get tight and stuck due to many different factors. Use a ball (we love the Hyperice Hypersphere Go!) under your foot. You want to move slowly and methodically through the entire bottom of your foot. (Feel the hurt so good!) You have 3 arches in the bottom of your foot and it’s important to get them all! If you find a spot that hurts more than another, it’s OK to hold there for 20-30 seconds before moving on. Spend 2-3 minutes on each foot before moving onto your calf.
In order to get into this strong position you want to push all the way through your toes which also requires your calf. In this bent kneed position you’re accessing a different smaller calf muscle called the soleus. As you’re using the ball through the back of your leg, don’t forget to move your foot and ankle into different positions. We like to bring the foot into the same position you’d be in for your throws, so make sure you point and flex your toes as you go! Spend another 2 minutes through the back of the leg before moving onto the next exercise.
Pro Tip – if your ball vibrates, definitely use it! The vibration feature will get you even more recovery benefits!
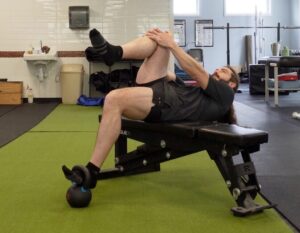
Foot and Calf Stretch

Our next stretch works through big toe extention, the plantar fascia, and your soleus muscle. Grab your block for this one. If you don’t have a track block, you can use a taller bumper plate or wedge to elevate your toes. This stretch reminds me of the calf stretch on the wall. The big difference is you don’t want to do this with a straight leg but a bent knee (hence no wall… you can’t really bend your knee into it). This is going to mimic the motion of you going up high onto your toes while having your knee bent for your throwing position. You’ll really feel this through the bottom of your foot including your toes. Keeping that knee bent is what allows you to access the soleus. If this is a little too intense to just hold, add some dynmaic movement. Try bending and straightening the knee to floss the muscle.
Posterior Tibialis Strengthening
This is one of our favorite exercises for strength and stability in the foot. What is extra cool about this is it strengthens in the exact range of motion you want to move through for your throws. Not to mention this exercise also strengthens your arches. What a double win! Place the band under your toes close to the ball of your foot. We are going to practice a 2 part sweeping motion. You want to point your toes down and then sweep them inward towards your center. We traditionally do this with a straight knee, but to liken it more to your throws we’re switching it up! Keep your knee bent while doing this exercise to train how your foot and calf muscles should work with that follow through position! Do 10-15 reps per foot.

Heel Toe Slides
Lastly we incorporate strength into the foot, ankle, and calf muscles. Start by elevating onto your toes, twisting and placing your heels down. Then rock back onto your heels lifting your toes, twisting to place them down. (This one is pretty hard to describe… make sure you watch the video!!) You want to move in 1 direction 5 times before going the other direction. Keep your knees bent to push over your toes. If you haven’t noticed the recurring theme here, this will help strengthen mimicking your throwing position!

Watch the full video for more detail!
You’re going to get the most from these exercises if you complete them in this specific order. Each exercise builds upon the previous one, which we did on purpose. Depending on how much time you have, do 3-4 rounds of these circuit style. You’ll feel your foot and calf loosen up. Enjoy tapping into even more power by driving through your foot enabling more snap and acceleration through your hip.
Let us know what you thought! Share with us on your socials if you loved these tips and how they’re helping your throws. Tag us @mobility_doc in your post!
Double Down On Your Mobility
Feeling stuck in your throws? The number 1 thing we see in our throwers is limited hip mobility holding them back. After working with some of the best in the world, we created a program specifically for everything a thrower needs. MDRx Hip Mobility For Throwers offers 4 weeks of daily programming to loosen all of the areas that matter. Start throwing further than you ever knew you could by improving the range of motion in your hips. Learn more here