
There is no question that Jiu Jitsu is physical. I mean, your goal is to push someone past the point of breaking… So what happens when you’re caught in a foot sweep or leg lock? You don’t tap early enough resulting in a strain, sprain, or worse a break. Recently we have been focusing on foot and ankle problems. That’s only because we’ve been getting a lot of questions about them! A friend of ours in the UK accidentally broke his ankle practicing Jiu Jitsu. A year later he is still struggling with mobility and feeling like he’s plateaued in healing. So he came to us (smart man) and we created a primer to push past the barriers he was facing. If you’re dealing with ankle stiffness post break, strain, or sprain, join us as we explain exactly which ankle rehab exercises you can do!
What are your injury/mobility related questions? Write to us on our socials and we will do what we can to answer!
Why Does My Ankle Feel Stiff?
The main culprit for stiffness in a joint after a break or serious injury is scar tissue. Scar tissue naturally forms as a healing response in your body. It doesn’t go away on its own and needs to be broken up so you can regain your full range of motion. You can break it up in a few ways but we want to put the power in your hands. Here are the best ways to take care of this at home!
As with any and all injuries, it’s important to make sure you’re at the proper stage of healing. Make sure you speak with a trusted doctor or professional before trying these ankle rehab exercises on your own.
Ankle Rehab Exercises
For the next 4 exercises you need a muscle flossing band and a foam roller. It’s important that the foam roller is very hard. If you don’t have a muscle floss band, you can still do these stretches, you just won’t see as much benefit or improvement.
Muscle Flossing The Ankle
Muscle flossing is one of the most effective DIY ways to break up scar tissue and adhesions in any muscle or joint. This form of therapy is unique because it also restricts blood flow then releases it. This flush of fresh blood provides extra healing benefits. When laying down the muscle floss band there are a few things you want to remember. You want to make sure you pull with 50-75% tension to make sure it’s tight enough. The second important thing is that you always want to slightly overlap the band on itself so you’re not missing a spot! Lastly, make sure you’re moving dynamically through ranges of motion. If you apply the band and perform static stretches you’re not going to get the same effects of breaking up those adhesions!

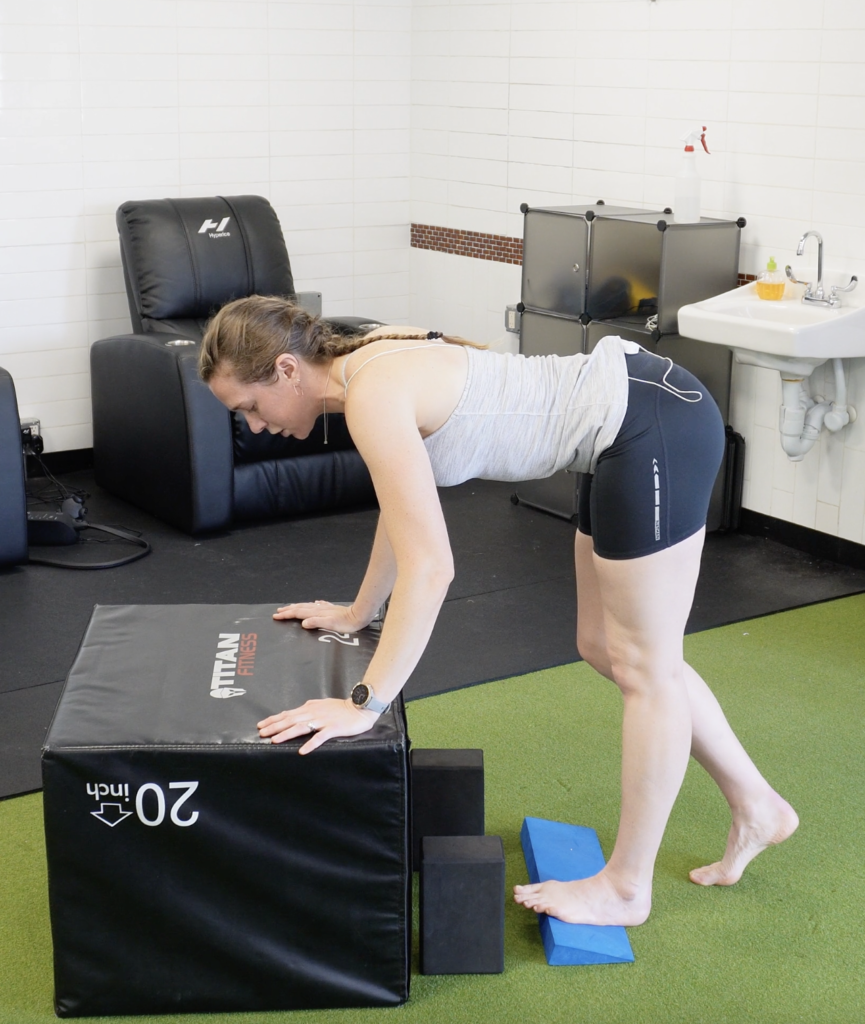
To wrap your ankle with the muscle floss band, be sure to start around your arch and work your way towards your heel. Be careful not to cover your heel. It’s important your ankle can move. Once you’re almost out of band, tuck in the end so both hands are free to move. We are going to go through 2 ranges of motion.
Dorsiflexion And Plantar Flexion
For dorsiflexion, you want your knee to track forward over your toes. You can hold down your heel with the opposite hand to make sure it’s not lifting off the ground. This is going to help you get the most stretch! Rock back and forth over your toes. It’s OK to move on the outside and even track to the inside (just a little bit). Just make sure your foot stays upright and strong and isn’t falling in or pronating.

Next plantarflexion. Now you want your foot to stay out in front of you with your knee slightly bent. To get this stretch you’re going to start straightening your knee fully. This should give you a big stretch in the front and back of your ankle. If you want to put a little twist on this, feel free to change the orientation of your foot! One way we like to do this is by turning the toes inward. Now continue bending and straightening your knee. You should feel breaking up adhesions on the outside of your ankle.
Important Tip: When muscle flossing make sure you don’t keep the band on for more than about 90 seconds. If it’s tight enough you’ll feel tingling and maybe even see color changes in your foot. Take breaks if necessary between stretches!
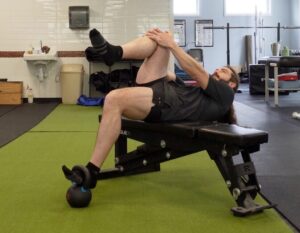
Heel Toe Slides
This ankle rehab exercise might seem a little different, but don’t let it fool you. Originally made by a men’s gymnastics coach to fix shin splints, you’ll quickly feel how this will help! Heel toe slides stabilize and strengthen your feet, calves, and ankles. You want to stand with your feet side by side and move them together. You’re going to lift up onto your toes (raising your heels) then twist your hips, and plant your heels down. To keep moving in the same direction, lift your toes, twist your hips. Repeat these 2 motions. What is important is to keep controlled movement and get good height when you lift your heels and toes. Make sure you go both directions evenly. Try doing 10 slides each direction. (This exercise I find particularly hard to explain so you should definitely watch the video!)

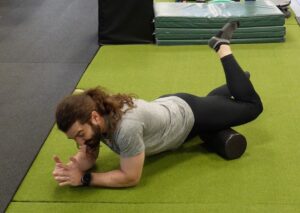
Walking On A Foam Roller
If you read earlier that we want you to have a hard foam roller, we weren’t joking! We love using a foam roller created from PVC pipe, but you can use one that has a hard interior. If the foam roller is too soft you risk it breaking or collapsing. Plus you won’t get the benefits. Walking on a foam roller requires balance and strength while providing active release. If you suffer from any kind of plantar fasciitis issues this is a game changer!

Once you’re comfortable standing, try rolling yourself forward with small steps. It might seem scary, but as long as you’re moving slowly you should just be able to step off if you feel yourself slip. If you’re really feeling unstable you can steady yourself with one hand on a table or bench. After mastering forward movement, try going backwards! This can be challenging so don’t expect to get it the first time! Expect your feet to be sore after this one. It does a great job with active release to the bottom of your feet.
Watch Our Full Ankle Rehab Exercise Video Here!
The primer really helped our friend and BJJ athlete get back to feeling like himself on the mat. What’s really important is you want to do these 4 ankle rehab exercises in this precise order. We placed them this way for a reason as each one builds onto the next. Be sure to reach out if you have any questions or need help creating your own primer to get you back to doing what you love!
Super Charge Your Recovery
Take your healing to the next level with MDRx Foot and Ankle Recovery. Made for BJJ athletes, this is going to give you a more wholistic healing for your injury. Everyone has been back from a tweak or sprain, testing the waters. The difference between them and you is after using this program you’ll know you’re ready. Use our MDRx Foot and Ankle Recovery program. Don’t worry wondering, or worse back on the bench. Start your program today!