Flat Feet Exercises For Every Day

John doing a flat foot exercise

Hey everyone!  If you’ve been following us for a while, welcome back!  If you’re finding us for the 1st time, we are excited you’re here!  Also, I strongly encourage you to read last week’s blog as this one relies heavily on some previously shared information!  We are going to start this week with a quick recap of the difference between rigid and flexible flat feet, but then we dive right into the importance of the posterior tibialis and some of our favorite flat feet exercises!  In the form of a primer of course 😉

What’s The Difference?

“Baby I Was Born This Way”

Rigid flat feet is the lesser common of the 2 types.  When you have rigid flat feet, that means you have bones and tendons that aren’t shaped 100% correctly to form your arches.  You are typically born this way and it can be harder to correct.  That being said, the exercises we are about to get into can still definitely help you!

“If I Could Turn Back Time”

Flexible flat feet are pretty common!  This is when your arches fall naturally over time or you suffer an injury.  It can even happen with sudden weight gain.  If you have flexible flat feet your arches will appear as if they’re there when you aren’t weight bearing.  After you put weight in your feet, the arches flatten.

A test demonstration of how you can tell if you have rigid flat feet

Posterior Tibialis

The posterior tibialis muscle and tendon are the not so talked about unsung heroes of how your arches are formed.  Many people talking about arches today discuss tib raises and lots of work dealing with the anterior tibialis (or the muscle that goes down the front of your tibia bone).   The posterior tibialis is found deep within the back of the leg.  It is an extrinsic muscle that attaches up in the back of the calf and down to multiple bones and points on the underside of the foot.  This is important because those attachments on the underside of the foot directly play into how the arch is supported.  By strengthening and training this muscle you will see your arches start to raise and become stronger!

For an indepth breakdown, check out the video from last week’s blog!

Flat Feet Exercises: Mobility-Doc Method Primer

Last week we worked on mobilizing the muscles and fascia in and around the arch.  This week we are going over how to strengthen them!  Our Mobility-Doc method primers consist of 3 exercises, one for mobility, one for stability, and one for strength. The 3 exercises are:

John using the hypersphere mini  as a flat feet exercise

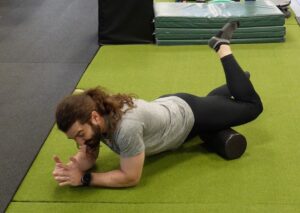
We used it last week, but it’s so effective we are doing it again! Use a hypersphere mini or lacrosse ball to break up the knots and get the connective tissue loose in the bottom of the foot!  Do each foot for 30 seconds per side

a flat feet exercise called arch doming
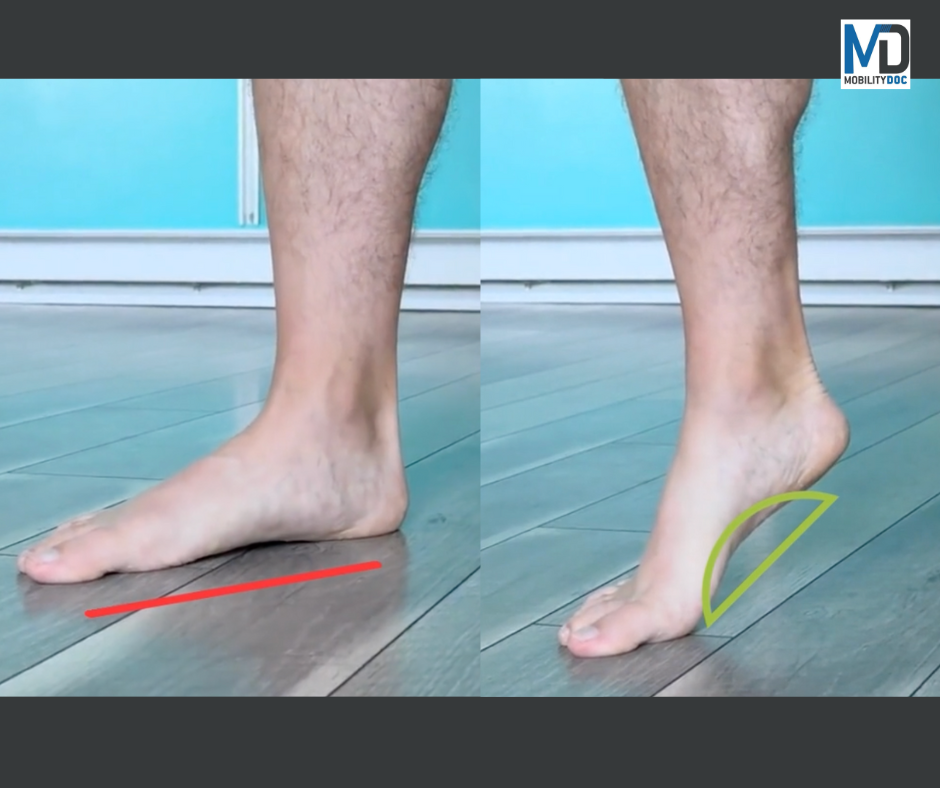
This subtle movement comes from within the foot.  You want to lift your arches without gripping your toes or using the wrong muscles.  (def. watch the video for this one!!!). Do 15 reps per side

a flat feet exercise to restore and reform your archesUse whatever band you like as long as it’s not too strong to keep you from doing the full motion.  Placement is important!  Put the band right where your toes meet your foot.  Not in the arch and not so it’s pulling on the toes.  The movement is to point your toes and then bring them to the inside.  (Lot’s of detail in the video on best practices!). Do 10 reps on each side.

Watch our detailed arch restoration primer video here:

Reforming and reshaping your arches is challenging and will take time.  It’s important to understand that you’ve potentially spent years walking with your arches in this fallen position.  Doing a few flat feet exercises 1 or 2 times isn’t enough to make lasting change.  You need to be dedicated and patient!

We Challenge You!

If you’ve made it this far, I’m pretty sure it’s because you’re looking for a solution to foot, arch, or even heel pain.  Maybe no pain, but you at least want to improve your arches.  We challenge you to do this primer for the next 4 weeks.  Our typical mobility challenge is only 10 days but since this is such a difficult area to work, we know that real change for most people will happen somewhere in week’s 2-3.  If you’re serious about improving your arches, do this primer!  Challenge your friends, family members and co-workers to do it with you!  We will help keep you accountable!  Post on your favorite social media platform and tag us so we can support you along your journey!

Atlantic City Here We Come!

This weekend we are heading to Atlantic City to support some of our favorite BJJ athletes in the ADCC trials!  Keep your eyes out on our socials for updates on Rene Sousa, Jon “Thor” Blank, Keith Krikorian, and more!

Jon "Thor" Blank
From L to R: Keith Krikorian, Dr. John, Rene Sousa

It's Never A Bad Time To Start

It’s always the perfect time to improve your foundation with functional fitness.  Have you tried other programs and it’s just been too much?  Too much time, too many exercises, never enough benefits…

Chloe stretching for her shin splints injury recovery

We are able to target the most important areas in your body in just 20 minutes with our Mobility-Doc method primers that have proven effective time and time again with our patients and even for ourselves.  Support your fitness.  Don’t replace it.  Join MDFit today.

What if you could get everything you needed to bulletproof your entire body in just 20 minutes 3 times a week.  You’re probably thinking too good to be true… But it’s NOT!   MDFit is the perfect mix of science, and education.  

Dr. John in a split stance with 1 leg in front of the other, hinging at the hips.

Follow Us

Recent Posts

Let's keep in touch!

Receive updates when our blog, featuring the latest health and wellness information, is released along with other special events – No, we won’t send you things every day, but once or twice a week!

Dr. Chloe and John