
If you’re feeling stuck in your squat or like you can’t get to the next level of mobility, you’re probably not alone. Many people suffer from limited mobility in their hips, knees, and ankles. We’ve discussed a lot about hip mobility and ankle mobility but what about knee mobility? If you’re working on knees over toes squats (heels elevated or not) this mobility hack is for you!
Causes Of Lost Knee Mobility
We lose mobility in our knees for a couple of reasons. Scar tissue can be a big factor if you’ve had an injury or surgery to the joint. Scar tissue builds up as a natural healing response in your body. If not broken up, you can suffer from limited range of motion, stiffness, and even pain.
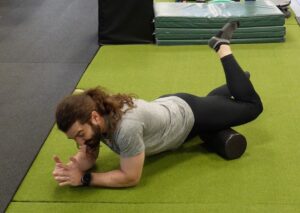
Another common cause of lost knee mobility are adhesions. If you’re one of those people who love to work out and neglect their recovery (stretching and foam rolling) you can bet you probably have some adhesions in your muscles. Adhesions are formed from microtears in your muscle fibers that aren’t properly lengthened to regenerate into long lean muscle. These shorter tighter fibers are more susceptible to tear and injury. Not only that, but short tight muscles pull on your tendons causing inflammation and other issues like tendinitis and discomfort in the joint.
Picture This…

Imagine a rubber band at rest. When you pull the rubber band it has a lot of stretch and easily returns to its natural form. Now think about stretching that rubber band to 50% and holding it there. You can’t let it go less than 50% stretch ever. Now stretch it even more. Picture in your mind how stressed it looks constantly being in that elongated state. This is what happens to your tendons that are being pulled on by tight muscles! They’re not able to have their full range of motion from being in a constantly stretched state.
How Can We Break These Up?
The 2 best ways for you to break up this knee stiffness at home are muscle scraping and muscle flossing. You’re going to need a muscle scraper and a muscle floss band.
Muscle Scraping
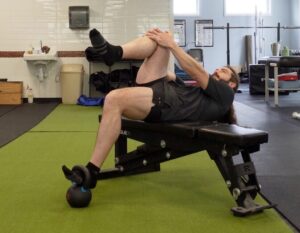
You’ll want to start seated with your knee bent. From here, you’ll work around your knee cap in small 2 inch increments. Be careful not to scrape the patella or knee cap itself. This doesn’t have any healing benefit and as a general rule of thumb you don’t want to scrape bone. As you’re working around your knee you may feel spots that are extra gravely or bumpy. This is the feeling of scar tissue or adhesions. When you find a spot like that you want to spend a little extra time there, maybe 20 seconds or so, before moving on to find another spot! Don’t scrape the area for more than 2-3 minutes total.
A few ways we like to level this up is by adding dynamic movements! You don’t have to just sit statically. You can bend your knee in and out while scraping. If you’re really looking for more, you can even move in and out of your squats while scraping. This takes coordination so make sure you’re up to the task!

If you’re looking to invest in a muscle scraping tool we love using Sidekick products. They offer very high quality tools that we use in the office without the big ticket price. Trust us when we say our patients believe they get the job done! Read more about which one is right for you here! If you already know, purchase your tool here! (This is an affiliate link where we receive a small portion of profit. Whether you use this link or not, we highly recommend their products!).
Muscle Flossing

Next we turn to good old muscle flossing. We’ve been talking about this technique a lot lately but it’s just because we love it so much! There is any other kind of muscle recovery that does exactly what this does, so grab your floss band and let’s go!
We’ll begin in a seated position again. To start wrapping, you want to be just below the knee. Wrap your first layer without tension so afterwards you can give a good pull. Then with 50-75% tension, you’re going to layer another 2 -3 wraps below the knee and then cross to above the knee. Do a few more wraps and then work your way back down again before tacking the band. It’s important to leave yourself a little window over the kneecap. You don’t want to go directly over the bone because you want leave your knee cap free to move.
Now that you’re all wrapped up, you have a few options. You can stay seated and go through ranges of motion by straightening and bending your knee into you or you can stand and do your squats! If you’re staying seated you can move through this range of motion for about 90 seconds. If you’re standing up to do your squats be prepared. This is a pretty intense feeling, not in a great way, but it’s so great for you! You’ll tackle part of your IT band, quad, hamstring, calf, and adductor. Once you go through about 10 squats or 90 seconds take the band off. You should be feeling a release of blood flushing to your limbs!
Check Your Results
After completing 1 round of muscle scraping and flossing it’s time to see how your knee responded. Get back into your squat position and squat down feeling any differences in the way your knee is moving. We personally were pretty surprised with the results of how much easier it was for the knee to glide forward after just 1 round!
Walk Through These Methods Step By Step with Dr. John in our Knee Mobility Video!
Important Tips
- Treat your knees equally – You want to do both sides, not just your problem one.
- Do 3 rounds! – You can alternate between scraping and flossing for 2-3 rounds per side
- Consistency counts – You can do this every day for the best results. If it’s a little too much to fit into your daily routine, make a point of doing this before every time you squat!
- Listen to your body – If you tried this a few times and your knee feels more aggravated, these might not be right for you right now. Make sure you see a trusted professional for guidance or clarity to make sure this is right for you!
We hope this duo of recovery tactics did great things for your knee mobility! Whether you’re trying to get your knees further over your toes, or just live pain free, these methods will definitely help you get there.
Worried about Knee Stability?
Is this new range of motion in your knee leaving it feeling wobbly? Sounds like you need to improve not just it’s flexibility but it’s strength and stability as well. Bulletproof your knee with our MDRx Knee program. It has 7 days of programmed flexibility, stability, and strength work that methodically challenges the joint. Don’t stress about if your knees are strong enough to handle what you’re asking them to do. Confidently do what you love by completing MDRx Knee Bulletproof program.